Creating Testimonials Layout with CPT and Beaver Builder
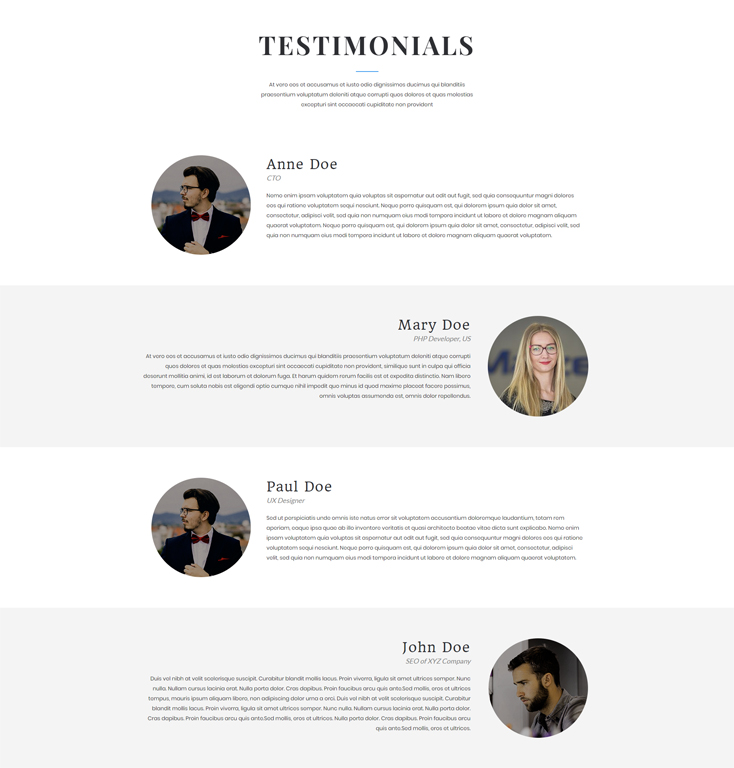
In this article I am showing how you will dynamically display the custom post types content in page builder. I created a custom post type “Testimonials” and some custom fields like name, photo, testimonial with Advanced Custom Fields plugin. Later I created a Testimonials page with Beaver Builder and displayed the testimonials. Here is my testimonials page:

I am using the following tools:
- Beaver Builder Plugin (paid version)
- Advanced Custom Fields plugin
I did pretty simple things and choose the testimonials page. But I am trying to show you how you will interact the custom post type’s content and custom fields data with Beaver Builder page layout without Beaver Themer add-on.
I am sharing the full steps at below.
Creating Testimonials Post Type
I am using manual code. But you can use any free tools for it. There have lot of free tools in WordPress plugin’s repo. So you can easily make the custom post type from Dashboard (without code). Open the functions.php file of your active theme and add this PHP snippets there. I used the register_post_type action.
Testimonials Post Type
/**
 * CPT: Testimonials
 */
add_action( 'init', 'probb_register_cpt_testimonials' );
function probb_register_cpt_testimonials()
{
	$args = array(
		'public'            => true,
		'labels'            => array(
			'name'               => _x( 'Testimonials', 'Custom post type label.', 'fl-builder' ),
			'singular_name'      => _x( 'Testimonial', 'Custom post type label.', 'fl-builder' ),
			'menu_name'          => _x( 'Testimonials', 'Custom post type label.', 'fl-builder' ),
			'name_admin_bar'     => _x( 'Testimonial', 'Custom post type label.', 'fl-builder' ),
			'add_new'            => _x( 'Add New', 'Custom post type label.', 'fl-builder' ),
			'add_new_item'       => _x( 'Add New', 'Custom post type label.', 'fl-builder' ),
			'new_item'           => _x( 'New', 'Custom post type label.', 'fl-builder' ),
			'edit_item'          => _x( 'Edit', 'Custom post type label.', 'fl-builder' ),
			'view_item'          => _x( 'View', 'Custom post type label.', 'fl-builder' ),
			'all_items'          => _x( 'All', 'Custom post type label.', 'fl-builder' ),
			'search_items'       => _x( 'Search', 'Custom post type label.', 'fl-builder' ),
			'parent_item_colon'  => _x( 'Parent:', 'Custom post type label.', 'fl-builder' ),
			'not_found'          => _x( 'Nothing found.', 'Custom post type label.', 'fl-builder' ),
			'not_found_in_trash' => _x( 'Nothing found in Trash.', 'Custom post type label.', 'fl-builder' ),
		),
		'supports'          => array(
			'title',
			'custom-fields',
		),
		'menu_icon'		=> 'dashicons-id',
		'menu_position'		=> 34,
		'publicly_queryable' 	=> true,
		'exclude_from_search'	=> true,
	);

	register_post_type( "testimonials", $args );
}
After adding the code you will get new menu “Testimonials” at left side panel in your dashboard.
Creating Custom Fields
Creating the following custom fields: name, photo, position and testimonial. I used the Advanced Custom Fields plugin. If you have not pro version, download the free version from WordPress repository and install it on your site. Now navigate to dashboard->custom fields->add new and add the fields like attached image.

Adding Testimonials
- Login to Dashboard
- Navigate to Testimonials -> Add New
- Enter title
- Enter author name
- Upload the photo
- Enter the position
- Enter testimonial
- Click on Publish button
You will repeat same process and add your all testimonials.
Creating a Beaver Builder Template
I am using the Beaver Builder plugin (paid version). Lite version will not work for this tutorial. Assuming that you already installed this plugin at your site. Now creating a simple testimonials template with page builder (see the video).
CSS for this layout only.
CSS
.fl-photo-img {
    border-radius: 50%;
}

@media (min-width: 768px)
{
    .tm-align-right p {
        text-align: right;
    }
}

@media (max-width: 767px)
{
    .testimonial-text .fl-rich-text p,
    .tm-align-right p{
        text-align: center;
    }
}
Creating Testimonials Shortcode
I am creating the shortcode [my_testimonials] which is fetching the all testimonials content from Testimonials custom post type and integrating the data with testimonials template layout. Shortcode is accepting one attribute: Beaver Builder Template’s ID. Open the functions.php file of your active theme and add the following PHP snippets
shortcode: my_testimonials
add_shortcode('my_testimonials', 'probb_testimonials_shortcode');
function probb_testimonials_shortcode( $atts )
{
	$atts = shortcode_atts( array(
		'id' => ''
	), $atts, 'my_testominials');

	//* Creating the loop args. Optimizing the query loop
	$args = array(
		'post_type' 				=> 'testimonials',
		'post_sttaus' 				=> 'publish',
		'fields' 					=> 'ids',
		'no_found_rows' 			=> true,
		'cache_results' 			=> false,
		'update_post_term_cache' 	=> false
	);

	//* getting all testimonials id
	$testimonials = new WP_Query( $args );
	if( $testimonials->have_posts() )
	{
		//* Force the builder to use this post ID.
		FLBuilderModel::set_post_id( $atts['id'] );

		//* Enqueue styles and scripts for this post.
		FLBuilder::enqueue_layout_styles_scripts_by_id( $atts['id'] );

		//* Print the styles since we are outside of the head tag.
		wp_print_styles();

		//* getting the template's row and dividing into 2 array
		$rows = FLBuilderModel::get_nodes( 'row' );
		$arow = array();
		foreach ( $rows as $row ) {
			ob_start();
			FLBuilder::render_row( $row );
			$arow[] = ob_get_clean();
		}

		$tmcontent 		= $temp_content = '';
		$loop_counter 	= 0;

		while ( $testimonials->have_posts() ) : $testimonials->the_post();

			$id 			= get_the_ID();
			$author 		= get_post_meta( $id, 'author_name', true);
			$position 		= get_post_meta( $id, 'position', true);
			$photo 			= get_post_meta( $id, 'photo', true);
			$testimonial 	= get_post_meta( $id, 'testimonial', true);

			if( $loop_counter % 2 == 0 ) {
				$temp_content 		= str_replace('#AUTHOR#', $author, $arow[0]);
				$temp_content 		= str_replace('#POSITION#', $position, $temp_content);
				$temp_content 		= str_replace('#CONTENT#', $testimonial, $temp_content);
				if( ! empty( $photo ) ) {
					$image 			= wp_get_attachment_image_src($photo, 'full' );
					$temp_content 	= str_replace('#PHOTO#', $image[0], $temp_content);
				}
			} else {
				$temp_content 		= str_replace('#AUTHOR2#', $author, $arow[1]);
				$temp_content 		= str_replace('#POSITION2#', $position, $temp_content);
				$temp_content 		= str_replace('#CONTENT2#', $testimonial, $temp_content);
				if( ! empty( $photo ) ) {
					$image 			= wp_get_attachment_image_src($photo, 'full' );
					$temp_content 	= str_replace('#PHOTO2#', $image[0], $temp_content);
				}
			}

			$loop_counter++;
			$tmcontent .= $temp_content ;
		endwhile;

		//* resetting the query loop
		wp_reset_query();

		//* Stop forcing the builder to use this post ID.
		FLBuilderModel::reset_post_id();

		//* Add srcset attrs to images with the class wp-image-.
		if ( function_exists( 'wp_make_content_images_responsive' ) ) {
			$tmcontent = wp_make_content_images_responsive( $tmcontent );
		}

		return $tmcontent;
	}

	return;
}
Creating the Testimonials Page
See the video: